Showing posts with label Procedures. Show all posts

Tuesday, March 11, 2025

Three kinds of wealth abstraction rules

I don't always have the time or the energy to track currency in my elfgames, and although I see the merit in doing so when you're aiming for a specific kind of gamefeel, it's not a great fit for every game. So why is this so often treated as the standard? I mean, it can't be pure nostalgia or blind adherence to the old ways; a lot of the games that still stick with this have traded inventory weight for inventory slots, for instance. Gold for XP could be a plausible reason, but then again, there's no reason you can't implement this with abstracted wealth rules. 

Now, while I can't give you a definitive answer to this conundrum (if there even is one), I have spent some time trying to come up with interesting rules for wealth abstraction, just for fun. If nothing else, perhaps these will inspire some game designers to question why they're still sticking with the ol' Copper/Silver/Gold standard rather than experimenting with fun and less disruptive ways of handling wealth in their games.

WEALTH POINTS

You can spend your wealth points (WP) to add positive modifiers to negotiation checks.

When the party finds treasure, tell them how many wealth points they acquired. A small amount of coins would be worth a single WP for the whole party, while a golden statuette with emerald eyes could earn them as many as 5 WPs.

When you want to buy something, you can make a negotiation check by rolling a d20 vs a Difficulty Rating of...  

10 (mundane/cheap items)
14 (uncommon/expensive items)
18 (rare/exclusive) 

You can bypass a negotiation check entirely by spending a fixed amount of wealth points for each item tier, as seen below: 

Common/cheap: 10 WPs
Uncommon/expensive: 15 WPs
Rare/exclusive: 20 WPs

If you still want to brute force your way through a purchase after a failed negotiation attempt, add +5 to the WP cost. Any wealth points spent on the roll are subtracted from the total cost.

✦ Design notes

So, these rules intentionally put a big emphasis on negotiations over fixed prices. This is meant to represent haggling, rather than how much each item is actually worth. Prices normally fluctuate between stores and different regions IRL, so I thought this was a nice way to incorporate that in a game. And since you always have the option of caving in and paying an exorbitant price even if someone is overcharging you for their wares, I added that bit about bypassing negotiations.

Finally, if I were to implement this mechanic in a game, I'd definitely want to prepare a reference list for treasure and another for typical items, just to keep things fair and easy to run.

WEALTH USAGE DIE

If you want to keep the Copper/Silver/Gold standard but don't want to bother tracking individual coins, you can simply assign an usage die for each. Then, make three item lists: one for things that can be bought with copper, another for items that can be bought with silver, and one for the truly expensive things that only gold can buy.

Copper can only buy from the copper list.
Silver can buy from the copper and silver lists.
Gold can buy from all three lists.

When you want to buy something, roll a copper, silver or gold usage die, as determined by what you're buying. If you roll a 1 or 2, drop the die by a step (d12 > d10 > d8 > d6 > d4 > nil). If you don't have at least a d4, you simply can't afford to buy the things you want.

After completing a quest or exploring a dungeon, the party can potentially increase their wealth usage dice by a step, depending on how much they earned or pillaged. The standard odds for wealth improvement are...

Copper: 4-in-6
Silver: 2-in-6
Gold 1-in-6

The odds above are subject to both positive and negative changes, per the fiction. If the party was promised a fortune in gold, they might have higher odds of improving their gold usage die. If they were simply out in the sewers killing rats, maybe they only get to try to improve copper or silver (not both), with gold being out of the picture entirely. Such is the life of an adventurer.

✦ Design notes

The biggest hurdle to implementing these rules in a game is deciding the starting wealth of PCs. Do you just give them a d4 in copper, in which case they're flat out broke? Are some classes (if you're using those) wealthier from the get go? Are some even poorer? Balancing this out can be fun, but it's the sort of thing that will directly inform how your game feels in play, at least until the party gets some experience under their belts.

GMs can play around with positive and negative modifiers to UD checks, by the way: depending on what you're buying (and from whom), the GM may assign you a positive or negative modifier. This is a good way to represent how cheap or expensive something is, as well as the seller's negotiation skills and their disposition towards the buyer.

WEALTH LEVELS

No rolls, no checks, just a simple Wealth Level (WL).

At WL1, you can afford common gear, travel rations, simple accommodations, basic services
At WL2, you can afford quality gear, specialized services, components, luxurious accommodations, weapons, armor, daily wages
At WL3, you can afford property installments, magic items, monthly wages, horses, livestock

Characters increase their Wealth Level by getting paid for their services, plundering dungeons and undertaking financial ventures. There's no need for hard rules and parameters, either: if it makes fictional sense for a character to be on WL2, then that's their Wealth Level. If they go on a buying spree and overspend, they may drop down to WL1. Easy, clean, simple.

OPTIONAL RULE: if you want to mix gold for XP with these rules, characters can only level up when they reach WL3. Afterwards, they must invest most of their funds into training under a competent tutor, dropping back to WL1.

✦ Design notes

There's no denying that this is an incredibly high trust approach to wealth, bordering on FKR, and that's intentional. If you're completely burned out on currency tracking, this will probably be your favourite take on wealth abstraction in this post. Similarly, this is a great fit for games where wealth doesn't matter all that much, although the optional rule can give it a bit more heft, if that's what you're looking for.

ALL ABOUT THAT CASH

A funny thing happened while I was writing this post: I no longer know how I want to handle wealth in most of the games I'm currently developing. A few of these could be a great fit for some of my games, and indeed, they were built on ideas I initially had for the aforementioned games, but dropped for one reason or another. In a way, I guess this means I succeeded at what I set out to do with this post; I just didn't expect to be on the receiving end of it!

Now if you'll excuse me, I gotta go have a design-induced existential crisis. Those are always a lot of fun!

Saturday, March 8, 2025

PLANTS!! Or, how to enrich your setting's flora

One of the things that impressed me the most about Avowed was how much care was given to the flora of the Living Lands. It's often vibrant, awe-inspiring and, most important of all, gameable. Want to upgrade your gear? Go harvest some plants. Need a way to deal with large groups of enemies, but don't want to invest in magic? Well, some plants are basically grenades, molotovs or acid bombs. Oh, and you know the cool looking ruins you've spotted on the horizon? They're probably overgrown by giant roots, or if you're lucky, something even cooler!

The way Obsidian managed to seamlessly integrate flora into so many aspects of Avowed made me think of how some of my favourite fantasy writers usually pay a lot of attention to the flora of their own worlds, and how important those details are to making an immersive setting.

In my experience, however, most GMs overlook this aspect of world building completely, myself included. Sure, some of us pay lip service to it, dropping a few references to coniferous trees, berries and stuff like that when prompted by the players, but that's usually as far as it goes.

And honestly? That's completely fine by me. We're just nerds facilitating a game, we can't all be expected to be master world builders who spend hours and hours researching what sort of flora would make the most sense for each region of our settings. Simply put, this is the type of effort that rarely pays off, like developing intricate economies for every city or kingdom.

Still, the reason behind my enthusiasm for Avowed's flora wasn't related to realism or research at all, but how fantastic and unique it felt. And that, my friends, is much more achievable for us lowly GMs. Achievable and gameable.

TABLES ARE ALWAYS THE ANSWER

Well, maybe not always, but that's what I usually default to whenever I want to generate interesting things fast. I quickly settled into six different categories:

Appearance: Usually the first thing the PCs will notice about a plant, and surprisingly useful for setting the mood, too. Drop some fleshy, writhing plants in the woods and your players are probably going to be immediately wary of the area.
Biome: The sort of region your weird plants are located in. Try generating at least a couple of plants for each major area in your setting, but don't be afraid of reusing a plant in multiple regions.
Interactions: Plants don't exist in a vacuum. Defining a few key ways they interact with their environment and the fauna that inhabits it is essential (and a lot of fun, too!).
Smell: Never underestimate the impact of describing a smell. Our olfactory memory is unreasonably powerful, and you should wield it responsibly.
Useful properties: I did mention this would be gameable, right?
Rarity: While most of the categories above are player-facing, this one is more relevant to GMs. You can outright tell your players how rare or common a plant is, but isn't it more interesting to let them work for that knowledge?

Now that we've established what each table will explore, let's dig in!

Elegant RPG Table
Appearance Biome Interactions
1. Glowing tendrils 1. Rainforest 1. Calms nearby creatures
2. Umbrella-like leaves 2. Desert 2. Makes observers hallucinate
3. Gem-like flowers 3. Tundra 3. Attracts and feeds wildlife (prey)
4. Thorny, enormous vines 4. Swamp 4. Burrows when it rains
5. Fuzzy, humming moss 5. Mountains 5. Shrieks when approached
6. Spiral petals 6. Grasslands 6. Protected by predators
7. Color-changing fronds 7. Volcanic 7. Attracts lightning
8. Knotted roots 8. Coastal 8. Unroots itself and migrates
9. Maw-like blossoms 9. Swamps 9. Trips travelers
10. Skin-mimicking bark 10. Rocky hills 10. Changes color near magic
11. Feather-like leaves 11. Fjords 11. Hosts friendly insects
12. Stained glass bark 12. Lakes 12. Attracts fairies
13. Skeleton-like branch 13. Graveyards 13. Worshipped by undead
14. Sparkling stems 14. Savannas 14. Boosts plant growth
15. Fur-like shrubs 15. Prairies 15. Houses prey animals
16. Covered in red sap 16. Riverlands 16. Contaminates water
17. Crescent moon flowers 17. Islands 17. Darkens surroundings
18. Iridescent spores 18. Wastelands 18. Taints the soil
19. Bioluminescent patterns 19. Overgrown ruins 19. Repairs structures
20. Pulsing, organic growths 20. Underground 20. Infested with spiders

Elegant RPG Table

Smells Properties Rarity
1. Rotting meat 1. Healing salve 1. Common
2. Sweet honey 2. Disinfectant 2. Uncommon
3. Fresh rain 3. Stamina potion 3. Rare
4. Burnt sugar 4. Strong adhesive 4. Very Rare
5. Spiced wine 5. Powerful antidote 5. Legendary
6. Crushed metal 6. Alchemical marvel 6. Seasonal
7. Bone dust 7. Armor-like bark 7. Endangered
8. Vanilla 8. Highly nutritious 8. Abundant
9. Cinnamon 9. Fire-starting oil 9. Cultivated
10. Wet fur 10. Insect repellent 10. Regional
11. Lavender 11. Poison enhancer 11. Corrupted
12. Dragon's breath 12. Dye-making flowers 12. Ancient
13. Sea salt 13. Paralyzing sap 13. Interdimensional
14. Goblin sweat 14. Fermented alcohol 14. Sentient
15. Blood 15. Magic enhancer 15. Transient
16. Sulphur 16. Demon bait 16. Infernal
17. Arcane fire 17. Charming fragrance 17. Artificial
18. Fairy dust 18. Rust removal 18. Sacred
19. Wet stone 19. Highly explosive 19. Cursed
20. Phoenix feathers 20. Water purifier 20. Mythical

WEIRD GREEN WONDERS

Yeah, that should do it. I'm excited to start making some truly bizarre plants and dropping them in my campaigns, and if y'all end up doing the same, I'd love to know how it goes!

Tuesday, December 3, 2024

HEXEMBER: Stinging-Tree Canyon

In an effort to get out of a rut and force myself to write anything (regardless of quality or relevance), I decided to start Hexember, a series of semi-daily blog posts in which I detail a hex y'all can drop in your hexcrawls. 

Hexember was inspired by Dice Goblin's Adventure Calendar Jam, and if last year's Adventure Calendar is anything to go by, we should be in for a bunch of treats until the 24th!

SIX MILES, BEST MILES

When running or building a hexcrawl, I have a personal preference for 6 mile hexes. They're big enough to support a few points of interest, but not so big that the players will be forced to spend days trying to traverse each hex. With that said, most (if not all) of the hexes presented in Hexember should be scalable to your taste, be it bigger or smaller.

HEXPLORATION

Every hex in the series will have at least two distinct points of interest, so if your system of choice doesn't have a procedure for exploring everything a hex has to offer, you can use the sample one below:
  • When the party enters a new hex, roll 1d4 and consult the list of points of interest in that hex. They'll have to pass through that point of interest in order to successfully cross the hex.
  • When the party explores a hex, ask them how many hours they plan to spend looking for points of interest. They can spend up to six hours scouring a hex per exploration attempt, and they have a X-in-6 chance of finding a new point of interest, with X being determined by the amount of hours spent exploring. If they're successful in their exploration attempt, roll a d4 to determine the point of interest they find; re-roll any results matching known points of interest.
  •  When the party explores a fully-mapped hex, let them know there are no more points of interest to be found. They can still move between known points (spending up to one hour to travel between any two of them), interact with their features and have random encounters, but they've seen all there is to see. Outwardly, that is.
And with that cleared up, let's get to our first hex!
 

STINGING-TREE CANYON

✦ At first glance

Green, rocky and oppressively narrow, Stinging-Tree Canyon is as beautiful as it is treacherous. The trees from which this patch of wilderness takes its name are impossibly tall, with spikes sprouting from their tough barks. Most of the canyon's wildlife is nocturnal, with birds of prey nesting in the treetops and their rodent prey burrowing in the trunks.

1. Hot Springs

A party couldn't ask for a better place to rest and recuperate than this. The canyon's hot springs offer a good view of its surroundings — as the area in which they're situated is slightly higher than the surrounding treeline —, and the waters are to die for. If any PC decides to take a bath in the springs, they have a 4-in-6 chance of getting rid of any maladies currently afflicting them.

2-3. The Boneyard

Craters, broken trees and piles of bones of considerable size litter this stretch of the canyon, with the occasional rusty weapon and ruined armor lying around as well. Whatever happened here wasn't exactly recent, but it wasn't long enough for the trees and the grass to recover from it.

If the party wants to search the bodies, they'll find 3d20 copper coins for every hour spent searching, up to a maximum of 150+d20 copper coins. The weapons and armors in the corpses are far too big and far too damaged to be of any use for a human-sized character, however.

4. The Giant's Mound

The entrance to a colossal cave blocked by an enormous boulder can be spotted from a mile away, but the incessant, deafening pounding can be heard from even further. The tribal markings on the boulder indicate this is the final resting place of a mountain giant, and although such mounds aren't particularly uncommon, they're usually far more quiet, and definitely not as impregnable.

This particular mound wasn't meant to keep grave-robbers from pillaging a mountain giant's precious ivory bones, but to keep a rotting, diseased giant from rampaging freely through the canyons and infecting anyone else with the Black Ichor.

When passing by the Giant's Mounds, the characters will notice that unlike the rest of the canyon, this area seems completely devoid of wildlife; the giant's endless hammering has clearly spooked them away from the vicinity. Once they near the mound's boulder, they'll spot the markings; a sufficiently knowledgeable PC might recognize some of the symbols as "funeral", "warning" and "plague".

Unless the party makes an effort to pass through the mound quietly, they have a 4-in-6 chance of alerting the shambling giant, in which case he will furiously wallop at the entrance's boulder for d4 turns before breaking free.

If the party decides to stay and fight, stat their sickly foe as you would any giant on your system of preference, but decrease his HD by 1. The poor creature is visibly ill, with black sludge pouring out of its festering body, and he will fight with blind, self-destructive rage. He is clearly suffering, and death would be a welcome release. Any attacks involving fire and heat will stun the giant for d4 turns and deal double damage.

Any survivors have a 2-in-6 chance of being infected with the Black Ichor; 3-in-6 if they engaged in melee. The first symptom will manifest in d4 hours as a persistent, mucous cough, followed by vomiting of a dark, thick substance. The infected character will experience violent urges after a day and will have an X-in-6 chance of succumbing to them, with X being determined by the number of days the disease was left untreated. Once they succumb, their wounds will seep with the same pitch-like sludge as the fallen giant's, and will be just as infectious.

The Black Ichor can be cured by any skilled druid, including a fellow party member. A competent druid will quickly identify the disease by its symptoms, applying a simple yet effective treatment: heat. No matter how virulent or cruel it may be, the Black Ichor can't survive the heat. Being covered in furs near a campfire for a full night should be enough to rid an infected character of the disease, after which they'll be immune to it in the future.

INSPIRATIONS

Most (or maybe all) Hexember hexes will be designed after something I like, and in this case, the inspiration was an episode from Primal, an animated series by Genndy Tartakovsky. If you enjoyed this at all, give it a shot! The episode in question is called Plague of Madness, and it's simply phenomenal.

PS: if anyone ends up using this in a game, I'd love to know how it went!

Monday, May 6, 2024

I started writing my own fantasy heartbreaker, and it's all Prismatic Wasteland's fault!

The title says it all, really. Have you ever been so inspired by a blogpost that you immediately started writing a brand new elfgame? Because folks, that's where I'm at right now. Prismatic Wasteland's rehabilitation of the To-Hit roll touched on an aspect of TTRPG combat that never quite worked for me. Automatic hits are cool, don't get me wrong, but they often still produce low/no damage hits, depending on the system, and that's almost as unsatisfying as missing. 

The ambiguity of Hit Points only makes things worse, in my experience. Some people see them as a character's health and damage as wounds (which is unfeasible in the long run), but personally, I like them better as Hit Protection, as exemplified by Cairn. This abstraction of how long a character can safely avoid a truly serious hit is much more satisfying to me than actually treating each and every lost point of HP as an injury.

And with that in mind, I started tinkering just like Tony Stark in that damn cave, but instead of scrap, I had pure gold to tinker with. Thanks, Warren.

ATTACK CHECKS

To make an attack check, roll your character's Attack Die. If the result is higher than the opponent's Defense, they lose an amount of HP equal to your base damage. If the roll’s result is lower than their Defense, you only deal half your Base Damage to their HP, rounded down.


Enemy attack checks are made with their Attack Die against the PC’s Base Defense. Rolling above it deals their full Base Damage to the character’s HP, while rolling below it does only half their Base Damage, rounded down.

Sometimes, it will be impossible to overcome the opponent's Defense with your attack die (e.g. d4 against 6 Defense). In this case, just apply half your damage to their HP normally, without rolling dice. The same goes for enemies.

Quite simple, yeah? What I tried to achieve with the rules in the excerpt above was a compromise between to-hit and auto-hit, while removing those pesky whiffs. You're always gonna deal some damage to the enemy's Hit Protection, you're always gonna soften them up a little. Defense, then, isn't a way of negating hits, but an abstraction of how good someone is at delaying the inevitable, and how much their armor can help them with that.

For clarity's sake, Base Damage is determined by adding the character's Attack Bonus (tied to class-based progression) to their weapon's damage. Base Defense works much the same way, adding the character's Defense Bonus to their armor's defense. That, of course, brings us to weapons and armor rules.

WEAPONS, ARMOR AND DURABILITY

To determine a weapon’s damage or a piece of armor’s defense, simply roll its damage/defense die once after purchasing, forging or finding it. The result is not permanent and can be increased by blacksmiths or decreased by excessive use.


At the end of a combat, if you rolled a 1 on any attack check, roll your weapon's Usage Die. If you suffered damage during combat, also roll the Usage Die for your armor and/or shield. Results of 1 to 2 reduce the damage or defense of the equipment corresponding to the die. 


The base price to recover defense points lost by a damaged weapon or armor is equal to ⅓ of its total value, rounded down. The price for improving the damage or defense of a weapon or armor by 1 point is equal to ½ of its total value. Blacksmith skill and special circumstances may increase or decrease both the price and the efficiency of the service.


Have I mentioned how much Prismatic Wasteland's blog influenced this? The coolest part of these rules was lifted straight from his blogpost! I just added durability and some tables. Speaking of which...

Fresh off the layout test!

Now, what use would those rules be without a list of weapons, armor and shield?

Kindly ignore the gibberish placeholder prices, please. I'm postponing those for as long as I can, lmao.

While writing this post, I realized I have yet to translate my armor and shield tables to English. Oops. I might update this later with them. Or not! My memory is rubbish.

INITIATIVE, DYING AND TACTICAL DEPTH

If you're curious about how I'd handle Initiative with these rules, then look no further than my previous blogpost! I'm still not 100% set on how I want to handle death, though, but one thing's for sure: lingering wounds after 0 HP are gonna be a thing, with "negative" HP being added to a roll on a lingering wounds table.

As for tactical depth, well, those of you who follow me on Twitter may be aware of my plans for a big two-parter post on expanded combat maneuvers and magic rules. Those are still happening, rest assured, and they're gonna play a big part in whatever comes out of this lapse in judgement (which has a tentative name already).

THE WYVERN HACK? REALLY?

I swear to god this came to me in a dream or something. It's (probably) not final. It's not original at all. I'm not even sure if it's good! 

So, what is The Wyvern Hack? Above all else, it's a marriage between my two favourite playstyles. NSR sensibilities with a PbtA bent. It's also a collection of procedures and random tables I made throughout the years, and an opportunity to put my own spin on some classic elfgame classes (check out the Dungeoneer!). And it's yet another fantasy heartbreaker with a generic name.

Still. A name is a powerful thing. It gives things purpose. Drives them forward. It inspires. If this project has any chance in hell of taking flight, that's what I'll need to be: driven and inspired.

And you know what? I always thought wyverns were much cooler than dragons anyway.

Friday, April 12, 2024

Better Rules for Maritime Adventures

To be brutally honest, I don't think I've ever read any OSR/NSR rules for naval combat and seafaring turns that didn't feel like a) they belonged in an ancient wargame or b) the designer's heart just wasn't in it, and they just wanted to get over and done with that part of the game as soon as possible. And as a fan of vikings and pirates, I always felt like this was such a disservice to something that could be just as fun as regular overland travel or dungeon exploration, both of which have been done superbly in several OSR/NSR games. 

The great thing about the OSR and the NSR alike (I'm still trying to figure out whether there really is a need for such a distinction, but I digress), though, is that when something hasn't been made yet, there's this strong encouragement to go ahead and do it yourself. So I went and did exactly that. Now, the title is presumptuous as hell, I know, but I really do believe these rules are pretty cool. They were heavily inspired by classic dungeon crawling procedures (such as OSE's) and by Apocalypse World 2e's vehicle rules and moves — a weird combination, for sure, but then again, most of my stuff is a mix of classic OSR and PbtA anyway. 

Time to dive in, mateys.

BUILDING YOUR SHIP

All seafaring vessels are described through the following attributes: Size, Speed, Handling and Hull. By default, every vessel has a score of 0 in these attributes. A ship’s Size category also affords it with a number of Armaments and Improvements, as seen below.

Size 0: Boats or rafts, for example. 1 Improvement, no Armaments.
Size 1: Small longships or sailing ships. 2 Improvements, 1 Armament.
Size 2: Transport ships or small galleys. 3 Improvements, 1 Armament.
Size 3: Large longships or sailing ships. 4 Improvements, 2 Armaments.
Size 4: Large warships or large galleys. 4 Improvements, 3 Armaments.
Size 5: Heavy warships or longships. 5 Improvements, 3 Armaments.

Any ship larger than Size 5 gets +1 Armaments for each number above that. Armaments can always be traded for further Improvements, and vice-versa.

Improvements are used to increase the ship’s attributes (except Size). Aside from its use in naval actions, Speed is also factored as an abstraction of how many hexes (or how many increments of 6mi) a vessel can cross in a day. Much the same way, Hull can be used as an abstraction for the ship’s maximum number of passengers and its cargo limit, with each point of Hull counting as 10 to 50 passengers (crew included) and 20 to 100 tons at most.

For the purposes of naval combat, Size counts as Hit Dice and should be rolled to determine the ship’s Hit Protection. Armaments start at d6 damage, but one can spend an Improvement point to increase that damage by a step. Speed is used to determine combat Initiative, and ships with the same Speed rating act simultaneously. Speed can also be used to determine the amount of squares a ship can cross in a combat grid per turn, if one is being used.

NAVAL ACTIONS

There are a number of actions a ship’s crew can take during their turns at sea. These actions can be undertaken by any member of the crew, but it is a good idea to assign functions among the party, such as captain, boarding leader, navigator, engineer and quartermaster.

• Undertake a journey: For each six miles of travel, the crew should make the following checks: Dexterity, to deftly keeping their ship on the right path, Wisdom, to properly determine what path that is, and Charisma, to keep all spirits high.
Failing any of these checks results in a 2 in 6 chance of triggering an encounter (DEX or WIS) or an event (CHA). In addition, failing the Dexterity check also halves the distance traveled, while failing the Wisdom check has a 2 in 6 risk of leading the ship the wrong way (roll a d6 to determine direction: 1. north, 2. northeast, 3. southeast, 4. south, 5. southwest, 6. northwest). 
Encounters should be rolled on an appropriate maritime encounters table, while events function much like a normal encounter, but with a table of situations pertaining only to the ship’s crew and their circumstances.
 
• Navigate perilous seas: In order to safely navigate troubled waters or obstacles, a crew member must roll under either their Dexterity or Wisdom, whichever is higher. They subtract the ship’s Handling from the result.
 
• Attack: When naval combat is initiated, the crew can make one attack for each of their Armaments. Crew members operating ballistic weapons must succeed at a Dexterity check, while ramming requires a Constitution check from the navigator in order to prevent their own ship from suffering any damage. Unconventional weapons such as Greek fire should trigger Wisdom checks. 
Although the brunt of the damage is always suffered by the ship itself, the enemy vessel’s crew always has a 2 in 6 chance of individually suffering half of the total damage dealt to their ship.
 
• Defensive maneuvers: When trying to avoid or minimize the effects of an enemy ship’s attacks, the navigator can check Dexterity to outmaneuver the attacks, or Constitution to bear the brunt of it. Succeeding at a Dexterity check ignores the damage entirely, while succeeding at a Constitution check halves it and eliminates the possibility of damage spillover to the crew (2 in 6 chance of individually suffering half of the total damage received by the ship, as above).  
Defensive maneuvers can also be used to avoid boarding. To do this, the navigator must pass a Dexterity check.

• Board: All it takes to board a ship is being close enough to it and passing a Dexterity check (done by the navigator). Once a ship is boarded by a crew, maritime adventure rules cease to be the focus, being replaced by regular combat procedures in the case of a fight or by a diplomacy challenge.

• Emergency repairs: When plugging holes, tying ropes or putting out fires, a crew member can check Intelligence to devise a workaround for the ship’s current maladies. Succeeding at that check restores d8 HP to the ship.

• Overtake & outdistance: When trying to overtake or outdistance a ship or sea creature outside naval combat, the navigator checks Dexterity if relying on their vessel’s Speed, or Wisdom if betting on its Handling. They subtract either Speed or Handling from the result.

SAMPLE SHIPS

Below are some examples of ships built with these rules.

Skeid longship

Size: 3
Speed: 2

Handling: 1

Hull: 2 (45 passengers, 80 tons at most)
Hit Protection: 17 (
3 HD)
Armaments: Archers (d6), spearmen (d6), ram (d6)

Man-o'-war

Size: 5
Speed: 1

Handling: 2

Hull: 3 (200 passengers, 300 tons at most)
Hit Protection: 28 (
5 HD)
Armaments: Heavy ballista (d8), light ballista (d6), ram (d6)

Trading cog

Size: 2
Speed: 2

Handling: 1

Hull: 2 (60 passengers, 240 tons at most)
Hit Protection: 10 (
2 HD)
Armaments: Archers (d6)

ON ABSTRACTIONS

There are a lot of abstractions here, and that's intended. Personally, I feel like trying to simulate the exact speed with which a ship travels in a good or bad day is a losing battle. There are just too many variables, and rather than making the game feel grounded, this just grinds it to a halt. At the end of the day, those "exact" measurements are still abstractions. They're just crunchier and less intuitive than they need to be, oftentimes for the sake of appearing realistic.

And with that said, I'll leave y'all with an epiphany I had while writing this post: these rules can be just as easily used for airships, with little to no adjustments.

Fair winds and following seas to all!

Wednesday, February 21, 2024

Adding Procedures & Random Tables to Vampire: The Masquerade, Part 3: Court Creation & Faction Play

You can't have courtly intrigue without a court, and the truth is, Vampire: The Masquerade barely provides you any tools to create one. Time to change that. While part 1 of this series gave you the tools to create a city of your own and part 2 made it easier to populate it, part 3 is where your sandbox will truly come to life. We'll start from the very bottom, diving into the personal connections that weave webs of intrigue and moving up to coteries before finally exploring some procedures and mechanics for faction play.

THE TIES THAT BIND

Every important NPC should have three personal connections to other NPCs (or even the PCs): one with a powerful figure, one with a coterie-mate, and one with someone from a different faction. At least one of those relationships needs to be negative, and at least one needs to be positive. Roll or choose on the d66 table below.

Here's an example:

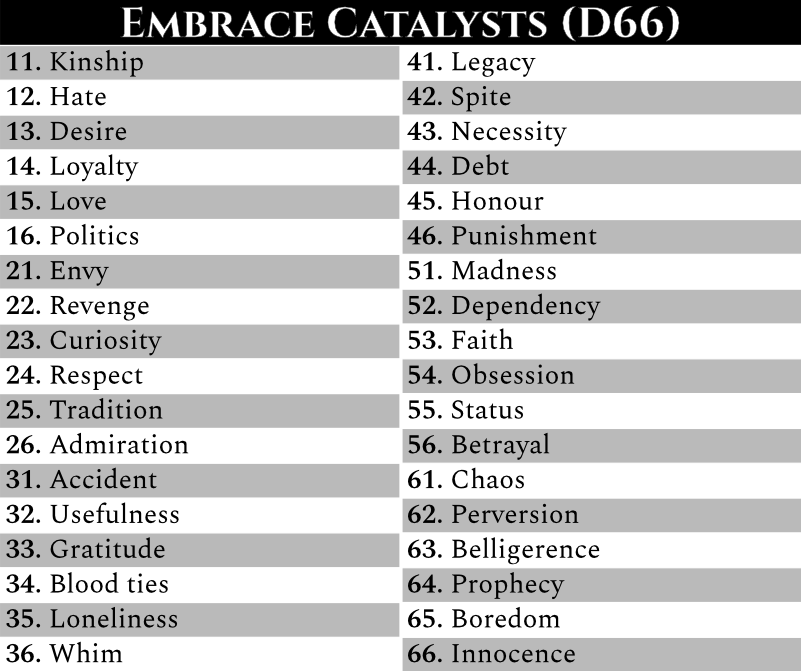
Vincenzo Vallone is a Hecata fledgling with the Thrill-Seeker Archetype. He is just and greedy, favouring trendy fashion, and he craves revolution. He was a disgraced gangster before the Embrace, which was an act of hate. His appearance is marked by thick hair, venomous eyes, and his friendly tone.

Figure of power: He is a thrall to his sire, Giancarlo Putanesca, entrapped by a full blood bond.
Coterie-mate: Vincenzo is indebted to Sniffer, a Nosferatu detective, who welcomed him into their Anarch coterie.
Inter-faction connection: The Toreador Prince, Alanis Whitehall, considers the fledgling an inconvenience, as his clan's very presence is unwelcome in her city.

Establishing these relationships can be tedious, but the payoff is worth it. Once you know who a character's enemies and allies are, it becomes a lot easier to involve them in your city's conflicts. If anyone threatens Sniffer, Vincenzo will be there for him. If the PCs need support against the tyrannical Prince Whitehall, the Hecata fledgling may be willing to stand with them. Instantly gameable, right?

Do note that this isn't meant to be the first step of court creation; it's better to do this once you've already generated all coteries, at the very least. The only reason we're discussing personal connections before coterie creation and faction play is scale — as in, it feels more natural to start at the personal level before moving on to the big stuff.

COTERIE CREATION

Before we start working on your city's coteries, let's get one thing out of the way: while PC coteries should always strive to have functional relationships between all members (as Vampire is still a collaborative storytelling experience, in spite of its themes), the same isn't necessarily true of NPCs. A little inner strife can do wonders for making NPC coteries feel alive and vibrant.

The first thing you should do when creating a coterie is decide its size and its political importance. Naturally, I made a table to help you out with that. Roll or choose away!

Once that's over and done with, it's a good idea to find what the coterie's purpose and focus is. The table below should help you with that, but if you want a coterie to be something else that isn't included in the table, no biggie! As long as there's common ground and/or a shared goal between the coterie's Kindred, it's all good.

And that's it! You can now start creating the individual members of each coterie. My Perchance generators can help you with that, and part 2 of this series goes more in depth into that process, too. If you're following the tables and procedures from part 1 while creating your sandbox city, it's a good idea to stay below (or at least around) the maximum number of Kindred that can be safely sustained by your city's population, but overpopulated and underpopulated cities can both be very interesting, too.

FACTIONS 101

Credit where credit is due: these mechanics were heavily inspired by Mindstorm's blogpost on the subject, as well as Remember Tomorrow's faction mechanics. It's a remix of those, really, with a bit of tailoring for Vampire. 

Now, "faction" is sort of a loaded word when it comes to Vampire: The Masquerade. It could mean anything from the sects, to blood cults and even powerful coteries. My personal definition of "faction" includes all of those things and more, as a politically-aligned group of people (or Kindred) who share the same goals. Ideally, you should only turn a group into a proper, statted out faction if they hold at least some sway over the city, or if they have the potential to. Otherwise, they're just a regular coterie or group, instead of a faction.

FACTION ANATOMY

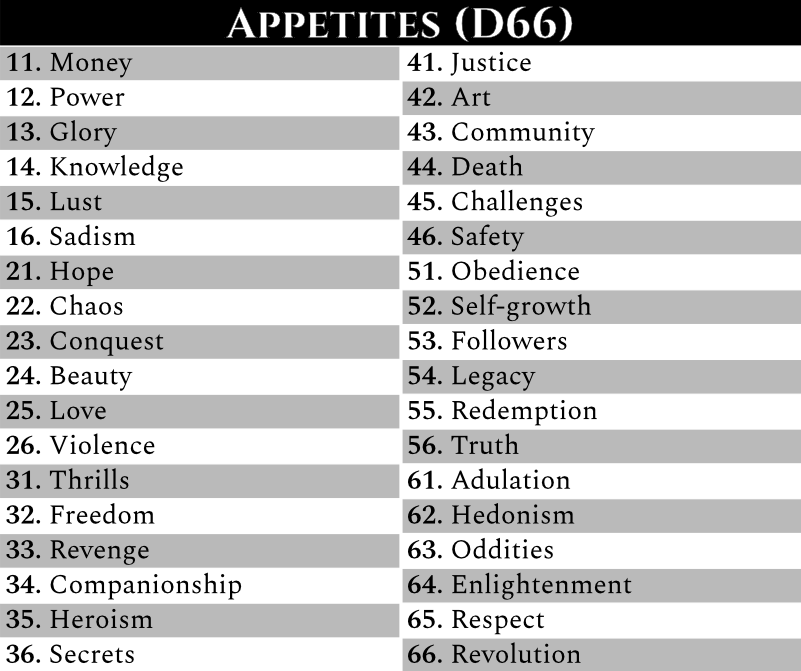
When developing a faction, you should start by looking at your city's lore, its Domains and their rulers, the main coteries and interesting connections between NPCs. Following the procedures from part 1 will automatically give you a few factions to start with, but if you're only interested in faction creation, you can roll or pick on the faction table¹, using the Appetite table to find a goal for your faction. 

Once you have at least an idea of what the faction is and what they want, you're ready to stat it out. Giving it a cool nickname/title is always nice, but that's optional. Each faction is comprised of three Fronts: Warfare, Influence and Capital. They each have an associated d10, which is what you'll be rolling during faction play (more on that later). Faction strengths and weaknesses are represented by Assets and Flaws, respectively, which can add Advantage or Disadvantage to certain faction actions (and that works exactly like you expect it to work).

Here's an example of a faction stat block:

• The Broken Tower (Camarilla offshoot)

Members: Prince Alanis Whitehall, Paris Johnson, the Sheriff, Daisy Mae and Wilhelm, the Harpies, and Primogens Wayne, Callum and Jazz.
Goal: The complete subjugation of every other faction in the city.

Fronts: Warfare [-1] Influence [0] Capital [0]

Assets: Popular Elysium [Diplomacy], Blood Trafficking [Bribe]
Flaws:
Weak Sheriff [Attack], Unlikable Prince [Recruitment]

Don't worry about balance. Kindred society is unfair by design, so why should faction play be fair? If you feel like a faction should be far stronger than the others, then give an Asset to each of their Fronts; as long as they still have a Flaw, that's peachy keen. If you feel like a faction should be weaker, stat it with several Flaws and perhaps a -1 on a Front or two. When in doubt, use the fiction to dictate the stats.

FACTION ACTIONS

Each Front can perform three distinct actions, as seen below.


Warfare actions are invariably offensive, representing direct attacks against enemy forces and strongholds, strategic surveillance of their movements, numbers and plans, and the underhanded destruction of their troops, equipment and bases. If the Sabbat storms an Elysium in the middle of court, they're launching an Attack against the Camarilla. When they use an infiltrator to spy on the Prince, they are engaging in Reconnaissance. If they plant explosives in the Sheriff's haven while he's out, they're partaking in Sabotage.

Influence actions cover key aspects of social maneuvering, such as forming alliances, bolstering the faction's ranks with fresh blood and spreading (mis)information through the city. If the Camarilla appoints a dissenting Toreador ancilla to the Primogen, they are using Diplomacy. If they allow each Kindred on the Primogen council to Embrace new childer, they are starting a Recruitment drive. When they spread footage of the Anarch Baron mistreating a fledgling, they are disseminating Propaganda.

Capital actions concern the management and application of a faction's resources, like investing in worthwhile endeavours, acquiring any equipment, building or services deemed useful, and buying favours, information or even loyalty. If the Anarchs offer to lend some of their guns to the local Duskborn, they're making an Investment. If they buy a huge supply of blood bags from a neighbouring city, they decided to Procure it. When they pay the neighbourhood's security firm to turn a blind eye to their comings and goings, that's obviously a Bribe.

ROLLING AND REWARDS

When one of a Front's actions is used, roll a d10. A result of 6 or above is a success, while a result below 6 is a failure (the consequences of which we will discuss in a bit). Before a faction executes an action, though, you should first determine which Reward they want, selected from the list below.

Rewards should always be rooted in the fiction. If a faction is trying to neutralize a Flaw, then that needs to be reflected in the fiction somehow. If you can't justify how a certain action results in a specific Reward, then perhaps it would be better to choose a different, more fitting reward for that action.

Failing a roll doesn't result in catastrophe; rather, the faction simply doesn't get the Reward they were looking for, and the fiction should reflect that. Sometimes, a failed attempt at assassinating the Prince's favourite childe can be even more exciting in play than a success.

GAME OVER, MAN

If one of a faction's Fronts ever falls below -3 and that Front already has a Flaw, then that faction is eliminated from faction play. That doesn't mean they simply vanish from the fiction, although that is a possibility. What this is meant to represent is that they simply don't have enough political power to keep playing with the big kids. The faction's remaining members could opt to join other factions, perhaps even becoming prime recruitment targets. 

Or, you know, they could all meet the Final Death. Whatever tickles your fancy. 

QUICK REFERENCE

• To execute a faction action, choose a Reward and roll a d10
• If the Front used for the action is damaged, subtract the modifier from the result
• If the result is below 6, the faction simply doesn't get the chosen Reward

• When a Front suffers damage, the faction adds -1 to any further rolls with that Front
• Factions can only remove damage from Fronts without Flaws
• Fronts can only be damaged up to -3
• If a faction's Front is damaged at -3 and it already has a Flaw, the faction is eliminated

• Relevant Assets grant Advantage (roll 2d10, keep the highest die) to an action type
• Each Front can only have one Asset
• Assets can only be destroyed when their associated Front is already damaged

• Relevant Flaws grant Disadvantage (roll 2d10, keep the lowest die) to an action type
• Each Front can only have one Flaw
• If a Front doesn't have a Flaw, the faction can take one to negate incoming damage
• It is impossible to remove a faction's last flaw

FACTION PLAY

There are a few ways to go about faction play, and none of them are wrong, per se. Call it a matter of taste.

The first is keeping faction play as a side activity for the Storyteller, something they do between sessions to spice things up in the city, allowing a few factions to pick an action. There shouldn't really be any hard rules to which factions should get an action, though the fiction will often inform these decisions. If the PCs are part of a faction taking an action, you can give them the option to support that action. They count as an Asset for the purposes of that roll.

The second is allowing the players to take control of a faction, while you control the others. Their PCs should ideally be part of the faction they're controlling, in order to avoid conflicts of interest. If you go with this option, you should probably engage with faction play either before or after actual play (that is, at the start or end of the session). You could do both, too. Whatever works for you and your troupe!

The third is a spin on the second; rather than controlling a single faction as a group, each player gets to pick one faction. Conflicts of interest are probably going to be inevitable, but this has the potential to be loads of fun! Other than that, this should work exactly like the alternative above.

FINAL NOTES

On occasion, it might not be immediately clear which action fits what a faction is attempting in the fiction, and the best way to ascertain that is by looking at their desired rewards. Going back to one of the action examples, if the Anarchs wanted to Develop the Duskborn coterie as an Asset (like, say, Duskborn Shocktroops), then they wouldn't really be Investing, they'd be Recruiting. But if they wanted to Accomplish something in the fiction (like diverting the Camarilla's attention towards the well-armed Duskborn), then that's definitely an Investment.

Faction Fronts, Assets, Flaws and even goals are inevitably going to be altered in the fiction due to the PC's actions outside of faction play, and that's okay. Make any necessary adjustments and move on. Faction play is meant to be an add-on, not the main course, and anything that happens during actual play takes precedence over it.

¹ The offshoots from the faction table are meant to represent local schisms — rolling a Camarilla faction and a Camarilla offshoot, for example, could represent a city contested by two Princes. This could also be interpreted as deviations from sect norms, resulting in things like Anarchs with wildly different political structures (think a Parliament rather than a Baron) or unusual traditions.


Wednesday, February 14, 2024

Adding Procedures & Random Tables to Vampire: The Masquerade, Part 2: NPC Creation

After a brief detour through a sandbox made with my city creation procedures and tables, it's finally time to dive into NPC creation! As with part 1, this involves a lot of tables, so much so that I even made some Perchance generators to help facilitate the process. You'll find those at the end of the post, but to be honest, I feel like they might actually be the main course. That's how happy I am with them.

Without further ado, let's Embrace some Kindred!

KNOW THYSELF

I'm thoroughly biased towards Vampire: The Requiem's virtues and vices, so much so that I made a table inspired by those a big part of my city creation process. While working on NPC creation, however, I noticed 12 virtues and 12 vices weren't enough, so I added a few more and rounded both up at 20.

This part of the process is meant to imbue each character with an admirable trait and a fatal flaw, something that the players can easily pick up on, and can act as a guide when you're unsure of what a certain character would do.

So, yeah, let's start by rolling (or choosing) a virtue and a vice for your NPC!


One big complaint a lot of people had regarding virtues and vices, though, was that they were a lesser form of the Archetypes (used for Nature and Demeanor) from Vampire: The Masquerade. While I don't necessarily agree with the sentiment (as those could be quite restrictive), I think they can be complimentary to each other.

It's up to you how important these are gonna be to your NPC's personality and whether you're gonna use the Nature/Demeanor mechanics, but I'd personally rather keep Archetypes as the "face" the characters present to the world and the way they interact with it, rather than a mechanical thing or an intrinsic, deep part of who they are. Virtues and vices work better in that regard, IMO.

In any case, let's pick or roll an Archetype on the d66 table below.

You can find full descriptions for these on V20, but you don't really need to, as they're all evocative enough.

BECOMING

Virtues, vices and Archetypes are plenty useful even when you're not creating vampires, but we should get the specifics out of the way before we go any further. Two of the most important facets of Kindred existence are age and the status that comes with it, and, you guessed it, there's a table for that.

This table can also be used with a d4 or a d6, ensuring lower power levels.

Another key aspect of Kindred society is lineage, and it's time to find out what clan chose your NPC. We're gonna determine the reason behind their Embrace later on, but for now, let's roll or pick a clan. The table below can also be found in part 1 of the series, but it's included here for ease of access.

To narrow the results down to the main clans, roll a d12 instead of a d20.

So far, we know the character's biggest virtue, their darkest vice, how they present themselves outwards through their Archetype, how old they are and what clan they belong to. What we don't yet know is what their place in the world used to be before the Embrace, but we're gonna fix that. First, roll or pick a flavour for their concept.

Then, if your character is a fledgling, a fresh neonate, a neonate or a young ancilla, determine their concept with the d66 table below.

If your character is too old for those concepts (that is, if they're an older ancilla, a pretender elder, an elder or a methuselah), determine their concept with the d66 table below.

I tried to make both the flavours and the concepts as dynamic as possible, because let's face it, boring concepts aren't usually the best ingredients for cool NPCs. Stuff like a respected activist or an inexperienced assassin should be immediately gameable, and that's always the goal!

It's as good a time as any to uncover what motivated the character's Embrace, which brings us to yet another d66 table. You know the drill.

And with that, there's only one table left before we move on to the last part of this NPC creation process: appetites. These are essential for Vampire: The Masquerade, as each and every NPC needs to want something, and those needs and wants will form the crux of conflict in many a chronicle. Note that they're deliberately vague, and leaving them for last was a conscious decision, as the other results can help you interpret what exactly your NPC's appetite means for them.

STYLE WITH SUBSTANCE

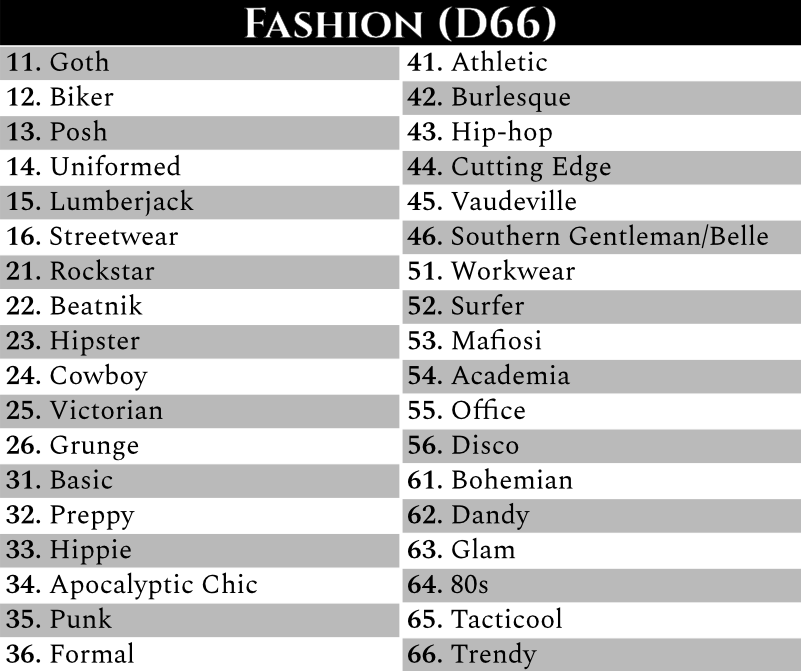
At this point, you already have a pretty well rounded character, but what's substance without a little style? The fashion table below should help your NPCs stand out a bit. Some combinations can be admittedly hilarious, but the famed Banu Haqim methuselah who fancies Disco a little too much is an instantly recognizable character. It's your choice whether to lean on that or not, though, and re-rolling is always an option.

I also made some d20 appearance tables (six, in fact), but I'm not gonna plaster them here, as this blogpost is already overstuffed with images. You can find them here. Personally, though, I wouldn't use all six for every NPC. I'd roll two or three for each (which is why the tables themselves are numbered 1 to 6), so that your players will get some interesting visual cues to go with the NPC's fashion choices, but not enough to overwhelm them.

That's all, folks! We're done with NPC creation.

CHANCE AND CHOICE

It's important to consider the pros and cons of manually rolling and choosing everything instead of just using the Perchance generators I came up with. If you're in a pinch and need an instant NPC, nothing beats a good generator, no doubt, and if you need to make a lot of Kindred at once, doing everything manually would be a royal pain. But there's a kind of art to curating results, one that can lead to some pretty remarkable NPCs. Personally, when time isn't of the essence, I will always choose to do everything myself. And yet, there's a certain joy to being surprised by the complete randomness created by Perchance.

VAMPIRE MAKING FACTORY 3000

So far, I have created three different Perchance generators for Vampire: The Masquerade, two to automate the process of NPC creation (one for younger vampires, one for older licks) and one for creating Domains and their rulers (a key aspect of the city creation process). You can find the NPC generator for younger NPCs here, while the one for older Kindred is available here. Lastly, the Domain generator is found here.

Fair warning: this was my first time working with Perchance, so you might stumble into some funky issues. If that happens, please let me know so I can fix it! <3

Anyway, I hope the results speak to you as much as they speak to me.

Up next: Court creation procedures and fleshing out Hallelujah's court! 


Sunday, February 4, 2024

Adding Procedures & Random Tables to Vampire: The Masquerade, Part 1: City Creation

I've been complaining about Vampire: The Masquerade's dearth of meaningful procedures for a long time, as the game (regardless of edition) sorely needs them. But rather than keep complaining, I decided to take matters into my own hands, starting with city creation. Fair warning: this might turn into a long series, or it might fizzle out after a couple of entries. 

Now, I don't know about you guys, but as a fan of sandbox campaigns, I'm severely disappointed in the tools Vampire provides for those, particularly when it comes to creating your chronicle's city. I've lost count of how many chronicles never even got off the ground because I got burned out during the prep stage. The procedures and tables we'll go through below were designed to fix that. 

Before we get started, though, credit where credit is due: d4 Caltrops made a terrific blogpost regarding city crawls, which was a huge influence on all of this. In fact, we'll even use one of the tools I found on the aforementioned blogpost. You guys should definitely check it out, as it could prove invaluable to your OSR campaigns!

Chris McDowall's amazing Electric Bastionland procedures for borough creation have also been a big inspiration here, and I consider them the gold standard when it comes to this stuff.

BLOOD RED STREETS

The first step here is finding a city map. You can generate your own easily with ProbableTrain's City Generator, and watabou's Medieval City Generator, with a few tweaks, works great for modern cities, too. Of course, you can absolutely use an actual, real world city for this, although that will have an impact on some steps. 

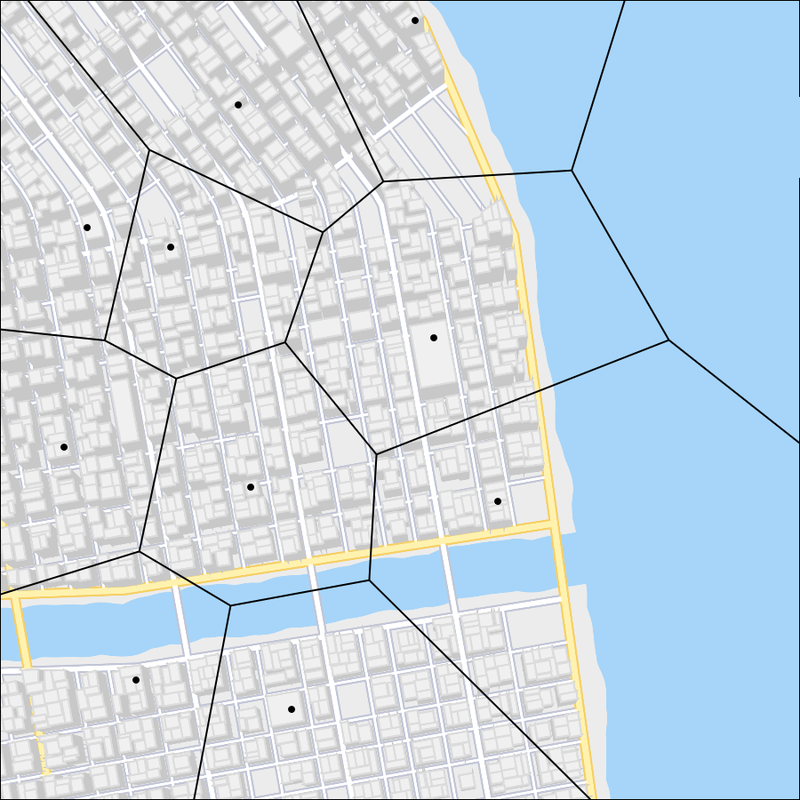
Once you have a city map you're satisfied with, you'll need to run it through Cfbraz's Voronoi Diagram Creator, though one could also use Gimp's mosaic generating filter for this step, or even manually draw over the map. If you choose to use the Voronoi Diagram Generator, you'll need to upload your map to a website of your choice, and link it on the generator. Its configs should look like this:

Afterwards, you'll want to click on Clear all sites. And then it's a simple matter of clicking on different points of the map until you've generated at least 8 sections. It might be a good idea to position your clicks on buildings, streets and areas that look interesting, as the resulting dots will be an important part of your city.

Here's an example of a map generated with the process above:

With this process, we've delineated the city's most important Domains, which we will flesh out later on. At this point, you might want to add numbers, cool titles or even neighbourhood names to each Domain with an image editor of your choice, but that's completely optional.

HISTORY WRITTEN IN BLOOD

Now that the technical part is done, we can start breathing life into the city.

The first thing we'll do is pick the city's themes and mood by rolling on the tables to the right. You should roll twice on each, assigning two results to the city's theme, and two results to its mood; it's your pick, so you can choose to mix and match between virtues and vices, or double down on them.

History is a big part of what makes any city feel alive, and by rolling on the tables to the right, you'll determine when it was founded, and how many significant historic events it's been through (which we will also generate later).

With that done, it's time to roll for the city's population, both mortal and Kindred. Do note that this will inevitably result in either under or overpopulated cities, Kindred-wise, so you may opt to roll once and use the same result for both tables.

The next step involves determining how the city's doing, economically speaking, and what its main source of income is. You can diversify its income by rolling a few more times on the Source table, and I would actually recommend doing that, if your city is fairly old and/or particularly big. 

And to conclude the mundane side of things, let's take a look at the historic events table (Kindred history will be dealt with later). You should roll or pick as many events as determined by the city's age, though nothing is stopping you from rolling or picking more.

WE RULE THIS CITY

By now, you should have at least a decent foundation for your city, which means it's time to flesh it out and to explore the Kindred side of things.

The table to the right will help you determine which faction rules the city, but you may want to add a couple of enemy factions, too. Of course, if you'd rather focus your chronicle on a single faction, rolling once is enough.

The city's main historic events have already been established on the mortal side of things, and now it's time to do the same for the Kindred. The city's age will also determine the number of events you should roll for. Make sure to spread these out throughout the decades, reflecting Kindred society's stagnant longevity.

We have finally reached my favourite part of this thing: Domains! First, pick an area on your map, then roll twice on the d66 table below to establish its traits. These should help you give an identity to each Domain, which can prove invaluable to naming the area, be it with a proper neighbourhood name ("Barrowtown"), a Kindred-given title ("the Big Empty"), or an evocative nickname ("Desolation Row").

All Domains need a complication, something that gives them an edge and makes them gameable. The table to the right will give your Domains an interesting issue, something your players can interact with, and perhaps even solve. One complication is enough, but adding more can illustrate just how bad things have gotten. 

On the flipside, there needs to be a reason why someone decided to claim the area as their Domain, and that's what you'll determine with the help of the benefits table. One is enough, as with complications, but particularly desirable Domains could (and perhaps should) have more.

If your city is home to multiple factions, you can either roll on the factions table to determine which one rules each Domain, or you can simply pick one. The clan table below can be used to decide the clan of the Domain's ruler, and it may come in handy in a variety of situations. 

To narrow the results down to the main clans, roll a d12 instead of a d20.

Each Domain has a little dot, which represents its central point of interest. While it doesn't necessarily need to be important to the city's Kindred, it works well as a "seat of power" of sorts for the Domain's ruler. To create a point of interest, you should roll twice on the d66 Traits table from before, and once on the table to the right. That will give you a location for your point of interest and some much needed flavour, too.

If you rolled a landmark, fret not! Here's a table to help you with that. Landmarks tend to be particularly relevant to a city's identity and history, so tying it to historic events or even its economy could grant it more weight. 

And that's it for Domain creation. Ideally, we should also generate the bloodsucker who claims the area as his property, but I'll save NPC creation for part 2. Time for some final considerations!

LIVING IN THE REAL WORLD

It should be pretty clear by now that this process was designed with the intetion of creating fictional cities, but can it be applied to real cities? I think so, but the process is significantly different for those. Rather than rolling on the tables above, you'll be picking options that match the city in the real world. Or maybe not! It's the World of Darkness, places are allowed to be different. The Kindred side of things should be a lot more relevant, in any case.

NOTHING BUT LEFTOVERS

Two tables, Climate and Region, didn't end up making the final cut, but they can still be useful in the right circumstances. They were omitted due to being way too general to add much value to the process, and the Region table goes into a bit of a hot button issue. As in, the omission of Africa and Asia was not intended as erasure, but rather as a consequence of Vampire's deeply problematic mishandling of both regions in the lore. You can still check those tables out, but I don't consider them part of the city creation procedure we've delved into here.

I'll end the post by letting y'all know that I've already done a bunch of work on the NPC creation procedures, and that I'm considering making a "city sheet" of sorts where you can store all this stuff. 

We might take a little detour before part 2, though, as I really want to write a post about a city created following these procedures. Lemme know if you guys would be interested in that!


Tuesday, January 23, 2024

Diplomacy procedures, bonding with NPCs and dating sims

My favourite thing about OSR and PbtA games is the way both of those support me as a GM/Master of Ceremonies with tangible mechanics, lessening the burden and the responsibility of choosing everything myself. Random tables, moves, principles, procedures — they're all incredibly useful when it comes to adjudicating what happens next. With that said, most OSR-leaning games leave a lot to be desired when it comes to diplomacy, negotiations and social interactions in general. 

Here's a little something I came up with to help with that.

WORKING ON THAT ATTITUDE

Reaction checks have always been the most important tool for social interactions in the OSR space, as far as I'm aware, and I'm not about to throw away the baby away with the bathwater. Reaction is great, though I feel like there's a lot more that can be done with it — like, say, Diplomacy challenges. But I'm getting ahead of myself. The term Reaction implies something far too immediate and transient, so let's swap it for Attitude, first. I swear it's not a meaningless change, though! Pinky promise. 

Now, let's look at a basic Attitude table I put together for our Attitude checks.

It's a lot like a Reaction table, and that's on purpose. Like I said, Reaction is great! Now that we have an Attitude table, though, we can go ahead and talk about Diplomacy challenges.

DIPLOMACY CHALLENGES

Rather than being a fixed, immutable thing, Attitude can be altered by Diplomacy challenges, though the PCs will need to offer a compelling argument, a bribe, a promise or even grovel at the target’s feet — that is, any and all forms of diplomacy can trigger this procedure. 

These challenges are comprised of one or more Parley checks. These work like normal Charisma checks, and although I'm partial to roll-under, I'm sure they'd work fine with DCs. Certain NPCs or creatures will react better (or worse) to certain actions, and the GM can apply Advantage or Disadvantage accordingly.  

The exact number of Parley checks one can make during a Diplomacy challenge is determined by the target's initial Attitude, which also influences how much you can sway them; see the table below. 


No matter how many PCs are involved in a particular Diplomacy challenge, the one with the highest Charisma will always make the checks, although the others may still contribute with modifiers and/or Advantage. It's up to preference.

Keep in mind that Diplomacy challenges are not always a possibility. It’s impossible to be diplomatic against NPCs and creatures that are outright Hostile, but even Adverse, Suspicious and Neutral characters may still prove unreceptive to negotiations, as dictated by their natures and/or their current circumstances.

SOCIAL LINKS BY ANY OTHER NAME

Players will latch on to the most unexpected NPCs, so when that happens, it's good to have a way of tracking where they stand with each other. Cue our next procedure: Bonds. In order to track a Bond, we need to establish an NPC's Likes, Dislikes and Wants — that is, something they approve of, something they disapprove of, and something they desire. You can get as specific or as abstract as you want with these, though specificity makes signaling these to your PCs easier.

Whenever the PCs do something that matches the NPC's likes, you can adjust their Attitude positively. Likewise, when the PCs' actions displease the NPC, you can adjust their Attitude negatively. Helping or hindering them with their wants has an even bigger effect on the NPC's Attitude towards the PCs, naturally. For ease of reference, consult the table below.

It is possible to completely break a Bond with an NPC, though that should only happen through particularly serious actions and events. When a Bond is broken, the NPC’s Attitude is immediately changed to Suspicious, and the party will never be able to increase it past Neutral again. 

Some actions may solidify a Bond between the party and an NPC. When a Strong Bond is formed, any and all negative Attitude adjustments are limited to -1. It is up to the Game Master to decide what exactly may lead to the creation of a Strong Bond, but Likes, Dislikes and Wants can act as indicators. Any time a Bond would go above Friendly (that is, over 12), the GM may also decide to turn it into a Strong Bond. 

If a Strong Bond is ever broken, it is permanently adjusted to Adverse. It’s impossible to break a Strong Bond with an Attitude higher than Neutral, no matter how dire the circumstances. Similarly, if a Strong Bond’s Attitude ever drops beneath 9 (Neutral), it becomes a normal Bond instead. It is up to the GM whether it’s possible to turn it into a Strong Bond again.

PFFT, WHO NEEDS PLAYTESTING

I do. No, seriously, I need to playtest this, because right now, it's just a jumble of ideas that may work beautifully, may turn into a huge chore, or may just end up turning my elfgames into dating sims (which would be a plus in my book, tbh). Once I get some mileage out of these procedures, I'll either update this post with the results, or make a new post altogether on the subject. 

Until then, if anyone ends up using any of this, I'd love to hear about it!

And if your campaign becomes a dating sim, please know that I am not sorry.